 Step 3: Preparing the Phyllo and Butter
Working with phyllo requires a bit of speed and care. Keep a slightly damp towel over the unused sheets to prevent them from drying out! 
-
Melt Butter: Melt and clarify the butter. Clarified butter (ghee) is preferred as it has no milk solids, which can burn, but melted butter works well too. Keep it warm.

-
Prepare Pan: Lightly brush the bottom and sides of a $9 \times 13$-inch ($23 \times 33$ cm) baking pan with melted butter.

 Step 4: The Layering Process
This is where the magic happens! We’ll divide the phyllo into three sections: a base, the middle/filling, and a top. (A typical package has about 40 sheets.)
A. The Base Layers (15-18 sheets)
-
Lay and Brush: Place a single sheet of phyllo into the prepared pan. Brush the entire surface lightly with the melted butter.
-
Repeat: Continue this process, layering and brushing 15-18 sheets of phyllo, one on top of the other. Be generous with the butter on the edges to ensure a crisp, golden crust!

B. The Filling Layer
-
Sprinkle: Once the base layers are complete, evenly sprinkle half of your nut mixture over the top layer of buttered phyllo. Try to cover the entire surface.

-
Middle Layers (5-7 sheets): Lay another 5-7 sheets of phyllo on top of the nuts, buttering each sheet individually. This separates the two nut layers.
C. Second Filling and Top Layers (15-18 sheets)
-
Sprinkle Again: Evenly sprinkle the remaining half of the nut mixture over the buttered phyllo.
-
Final Top Layers: Finish the assembly by layering the remaining 15-18 sheets of phyllo, buttering each one meticulously. Be especially careful to butter the very top sheet thoroughly!

Page 3:  Cutting, Baking, and the Grand Finale
 Step 5: The Crucial Cutting Step
You must cut the baklava into shapes before baking it. This allows the syrup to seep into all the layers later on, and prevents the top crust from shattering! 
-
Trim: Tuck any overhanging phyllo edges into the pan for a neat finish.
-
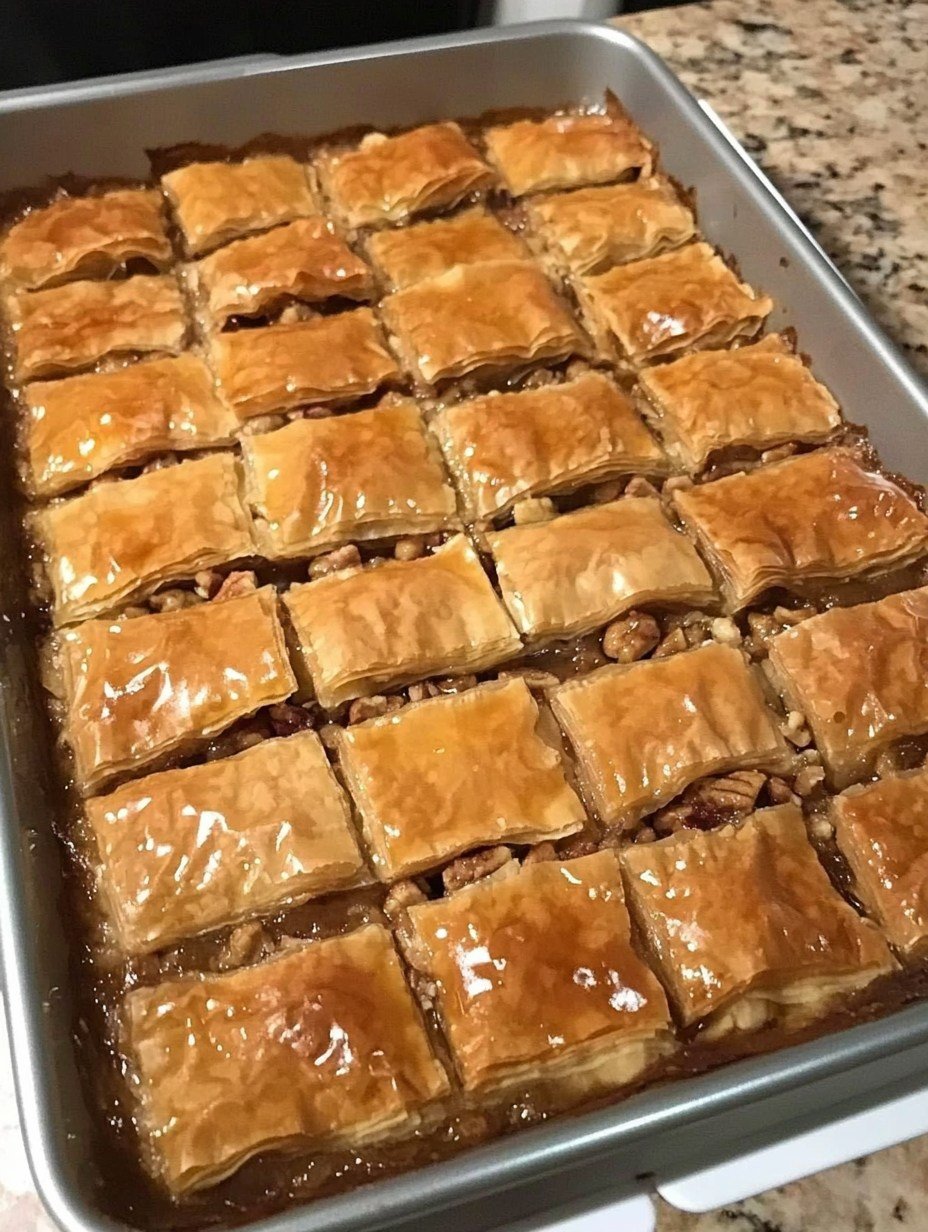
Cut: Use a sharp knife to cut the baklava all the way down to the bottom of the pan. The traditional diamond or square pattern (as seen in the photo) is beautiful. For the photo’s look, aim for a 5×5 or 4×6 grid of squares/rectangles.

-
Brush: Give the top a final, generous brush of melted butter—this guarantees a beautiful, golden brown color.

 Step 6: Baking to Golden Perfection
Patience is key for a perfectly crisp baklava. It bakes slowly to ensure the bottom layers cook through without burning the top.
-
Preheat: Preheat your oven to $325^{\circ}F$ ($160^{\circ}C$).
-
Bake: Place the baklava in the preheated oven.
-
Timing: Bake for about 45-60 minutes. Keep a close eye on it. The baklava is ready when the top is a deep, rich golden-brown color and the edges are bubbling lightly.

 Step 7: The Grand Finale – Syrupping!
This is the most satisfying step! The dramatic sizzle is a sound of success. 
-
Remove: Immediately remove the hot, golden baklava from the oven.

-
Pour: Slowly and evenly ladle the completely cold syrup all over the hot baklava, making sure to pour it over all the pre-cut lines so the syrup soaks down to the bottom.

-
Sizzle: The contrast in temperature (hot baklava, cold syrup) is what creates that wonderful, signature “shattering” crispness. You will hear a loud sizzle!

Serving and Storage
-
Rest: Allow the baklava to cool completely and let the syrup fully absorb for at least 4-6 hours, or ideally overnight, at room temperature. The longer it rests, the better the flavor and texture become.

-
Garnish: Once cooled, garnish each piece with a sprinkle of crushed pistachios, a cherry, or a sprinkle of cinnamon for a beautiful presentation!

-
Enjoy: Serve at room temperature. Baklava keeps well at room temperature in an airtight container for up to 1-2 weeks. It should never be refrigerated, as this will make the phyllo tough.


 Enjoy your incredible homemade Baklava! This recipe delivers the delicious, gooey, crunchy, and aromatic dessert you’ve been dreaming of!